
Hearing a faint ticking noise coming from under the hood of your Honda Civic can make any car owner nervous. Honda engines are famous for lasting hundreds of thousands of miles with basic oil changes. However, many owners forget about one crucial internal engine service. That service is the valve clearance adjustment.
As your Civic accumulates miles, the tiny gap between the valve stem and the rocker arm changes. Keeping this gap properly adjusted ensures your engine runs smoothly, maintains great fuel economy, and avoids catastrophic damage.
Understanding the correct service intervals, expected costs, and warning signs will help you keep your Civic on the road for a long time. This guide covers everything US car owners need to know about Honda Civic valve clearances.
What Is a Valve Clearance Adjustment and Why Does It Matter?
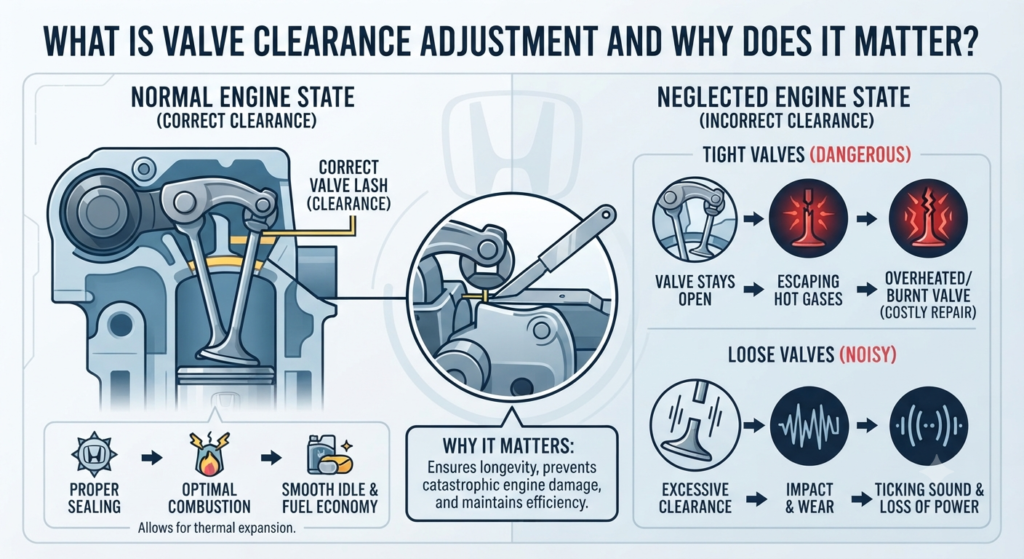
Inside your Honda Civic engine, intake and exhaust valves open and close millions of times to let fresh air in and push exhaust gases out. To do this efficiently, these valves need a tiny microscopic gap known as valve lash. This gap allows for metal expansion as the engine heats up to operating temperature.
Over time, constant pounding causes the valve seats and faces to wear down. When this happens, the valves sink deeper into the cylinder head. This reduces the clearance and causes the valves to stay slightly open even when they should be fully closed.
Conversely, wear on the camshaft lobes can sometimes cause the clearance to widen. Loose valves create a noticeable ticking sound. Tight valves are much more dangerous because they can lead to burnt valves, compression loss, and expensive engine rebuilds.
Official Honda Civic Valve Adjustment Intervals
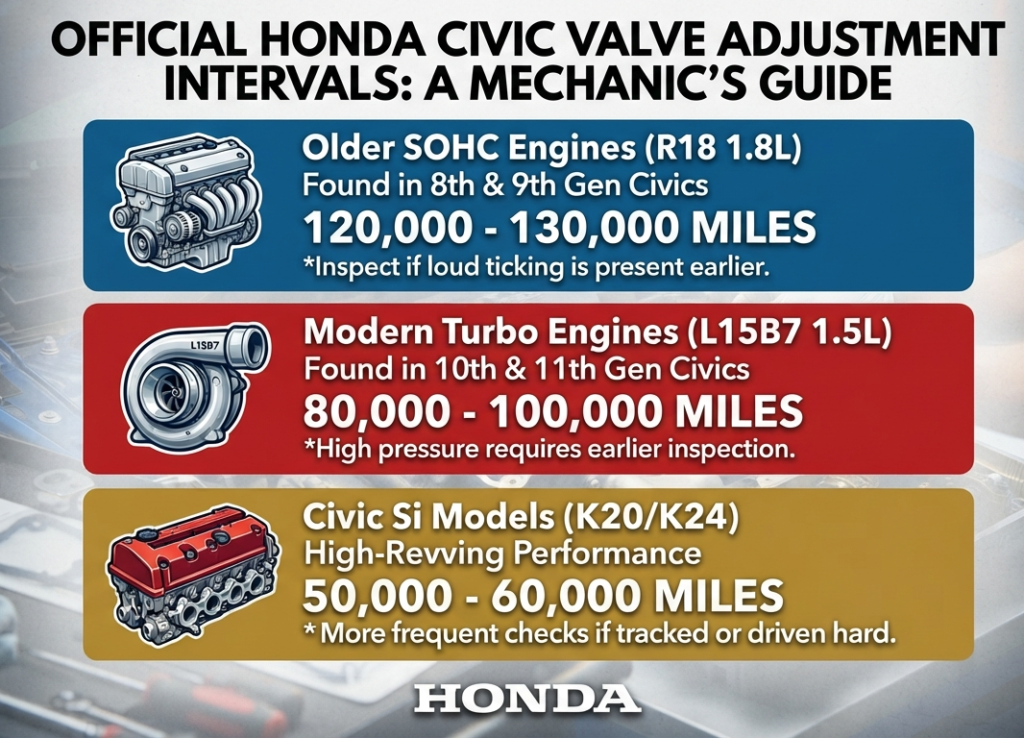
Honda engineers design these engines to be durable, but manual valve inspections are still necessary for many models. The official owner’s manual typically recommends inspecting valve clearances between 100,000 and 110,000 miles.
However, professional mechanics often suggest a slightly different timeline based on real-world driving conditions:
- Older SOHC Engines (R18 1.8L): Found in 8th and 9th generation Civics. These engines are quite robust and can often push past 120,000 to 130,000 miles before needing an adjustment, unless a loud ticking starts early.
- Modern Turbo Engines (L15B7 1.5L): Found in 10th and 11th generation Civics. Because these engines operate under high combustion pressures and forced induction, mechanics recommend checking clearances closer to 80,000 to 100,000 miles.
- Civic Si Models (K20/K24): High-revving performance engines require more frequent checks. Many enthusiast owners inspect them every 50,000 to 60,000 miles if the car is driven hard.
Warning Signs Your Civic Needs a Valve Adjustment Now
You do not always have to wait for the odometer to hit 100,000 miles. Your engine will give you clear warning signs when the valve lash falls out of specification.
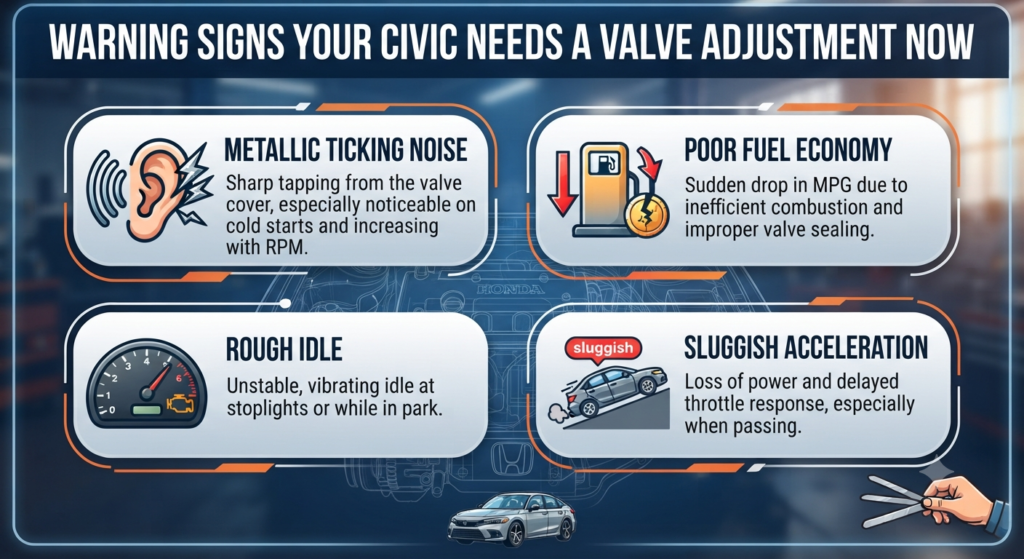
One of the most common signs is a metallic ticking or tapping noise coming from the valve cover during cold starts. While fuel injectors naturally make a clicking sound, a loose valve creates a sharp rhythm that gets faster as you press the gas pedal.
You might also notice a sudden drop in your fuel economy. When valves do not seal correctly, combustion efficiency drops, forcing your engine to burn more gas to make the same power.
Other red flags include a rough idle at stoplights, engine misfires without a clear spark plug cause, or sluggish acceleration when you try to pass someone on the highway. Ignoring these symptoms can transform a simple adjustment into a burnt valve emergency.
Honda Civic Valve Adjustment Cost Breakdown in the US
Budgeting for car maintenance is important, and service costs vary depending on whether you take your car to a professional shop or tackle the job in your garage.
Professional Shop and Dealership Pricing
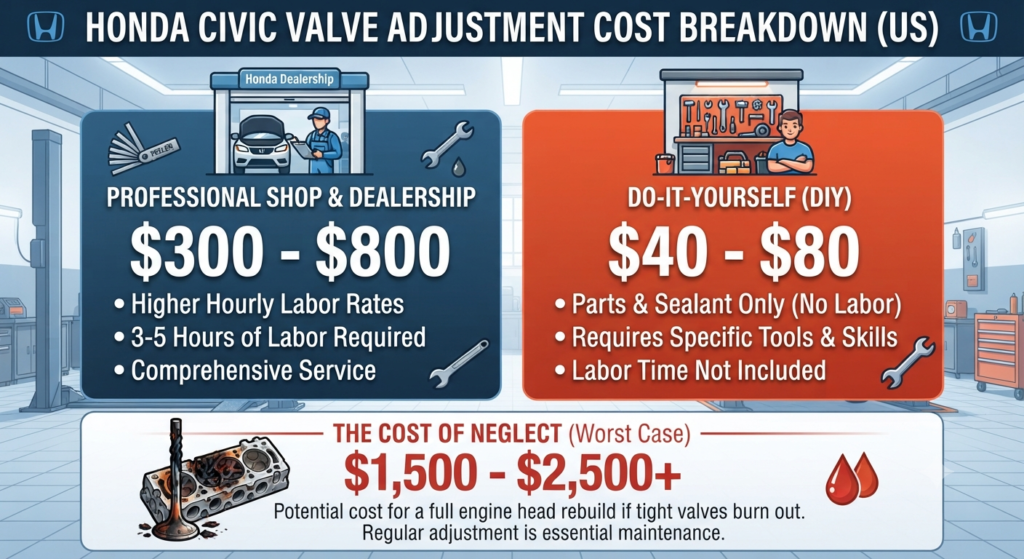
Taking your Civic to an independent mechanic or a local Honda dealership usually costs between $300 and $700. Dealerships tend to charge on the higher end of that spectrum, often ranging from $500 to $800 due to higher labor rates. The labor takes about two to three hours because the engine must be completely cold before the mechanic can accurately measure the gaps with a feeler gauge.
DIY Budget
If you have basic mechanical skills and a garage, doing this job yourself is much cheaper. You only need to pay for a new valve cover gasket set, some Hondabond sealant for the corners, and basic tools like a feeler gauge and a torque wrench. Total DIY costs usually stay between $40 and $80.
The Cost of Neglect
Skipping this maintenance to save money is a risky gamble. If a tight valve burns out completely, replacing it requires removing the entire cylinder head. A professional burnt valve repair job easily costs $1,500 to $2,500, completely wiping out any short-term savings.
Overview of the DIY Adjustment Process
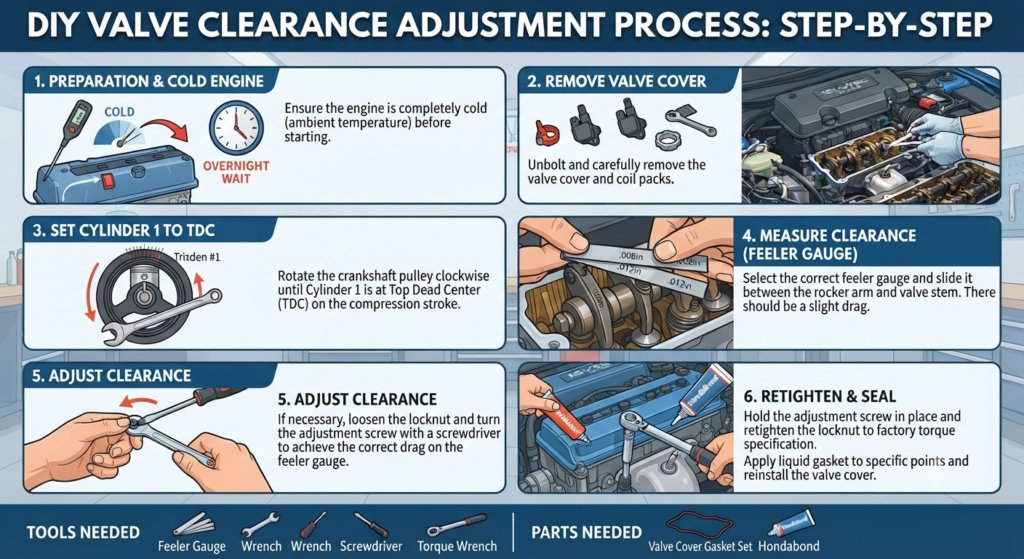
If you decide to do the job yourself, preparation is key. Here is a quick overview of how the process works:
- Park your car overnight so the engine is completely cold. Working on a warm engine gives false clearance measurements.
- Remove the ignition coil packs and the plastic valve cover. You will need to carefully rotate the crankshaft pulley to bring each cylinder up to Top Dead Center on the compression stroke.
- Use a precise feeler gauge to measure the gap between the rocker arm and the valve stem. Compare your measurements to the official factory service manual specs for your specific engine code.
- If the gap is too tight or too loose, use a flathead screwdriver and a box wrench to loosen the lock nut, turn the adjustment screw slightly until the feeler gauge slides through with a light drag, and retighten the nut.
- Always apply a dab of liquid gasket to the camshaft holder steps before reinstalling the valve cover to prevent future oil leaks.
Smart Maintenance Tips for Your Civic

Combining service items saves you time and effort. Since you already have the valve cover removed, it is the perfect opportunity to inspect your spark plugs, replace old tube seals, and check the condition of your serpentine belt.