
You are driving your Honda Civic Sport when you hear that dreaded, high-pitched scraping sound against the curb. You pull over, get out to check, and there it is. A nasty, silver-colored scar on your beautiful black rims. It happens to the best of us. That shiny or matte black finish on the Sport trim is a magnet for curb rash, and seeing that raw, silver metal underneath is incredibly frustrating.
The good news is that you do not need to replace the wheel. You also do not need to spend hundreds of dollars at a professional body shop or wait days for a specialized repair service. You can fix this at home with the right technique, a few inexpensive tools, and a bit of patience. In this comprehensive guide, we will cover exactly how to match your paint, prep the surface, and execute a professional-grade repair that makes that curb rash disappear.
Understanding Your Honda Civic Sport Rim Finish
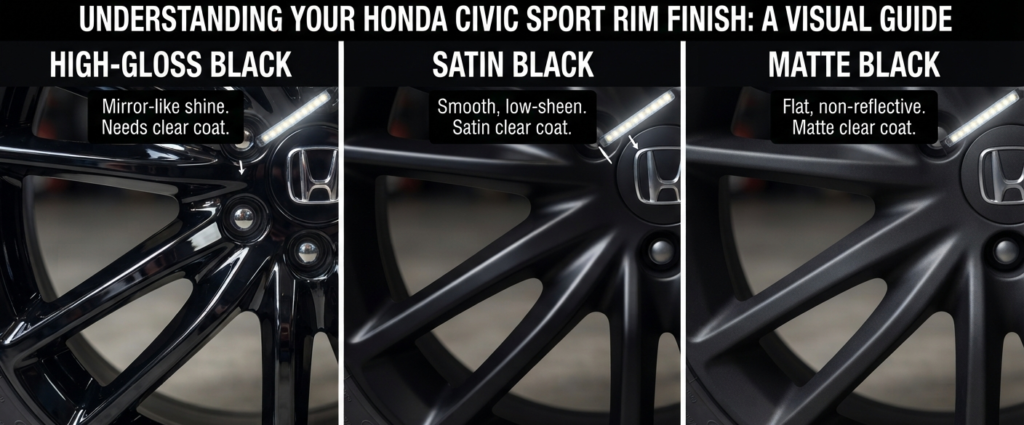
Before you buy any paint, you must identify your specific rim finish. This is the biggest mistake most owners make. Honda Civic Sport rims come in different factory finishes, including gloss black, satin black, and sometimes matte black. If you apply gloss paint on a matte rim, it will stand out immediately. It will look significantly worse than the scratch itself because the light will reflect off it differently.
Take a clean cloth and wipe the area near the scratch to remove any brake dust. Look at how the light reflects off the rim. If it is shiny like a mirror, you need a high-gloss black paint. If it looks flat, dull, or has a soft sheen, you need a satin or matte finish. Matching the sheen is actually more important than matching the black pigment itself.
The Professional-Grade Tool Kit
You do not need an industrial paint booth to get professional results. However, using the correct supplies makes a massive difference in how long the repair lasts. Here is your shopping list for a high-quality finish:
- Automotive Masking Tape: Use high-quality painter’s tape that won’t leave residue.
- Sandpaper Variety Pack: You will need 400, 600, and 2000 grit wet/dry sandpaper.
- Etching Primer: This is non-negotiable for aluminum wheels to ensure the paint bonds correctly.
- High-Quality Automotive Touch-up Paint: Choose the sheen that matches your factory wheel.
- Isopropyl Alcohol: For deep cleaning and degreasing.
- Micro-brushes: These allow for precision application.
- Automotive Clear Coat: Essential for gloss finishes to match the factory depth.
Do not be tempted to use nail polish, household spray paint, or craft paint. These products are not designed to handle the intense heat generated by your brakes or the high-speed road debris your wheels encounter. They will crack, peel, or fade within a few weeks, leaving you with an even bigger mess to clean up.
The Step-by-Step Repair Process
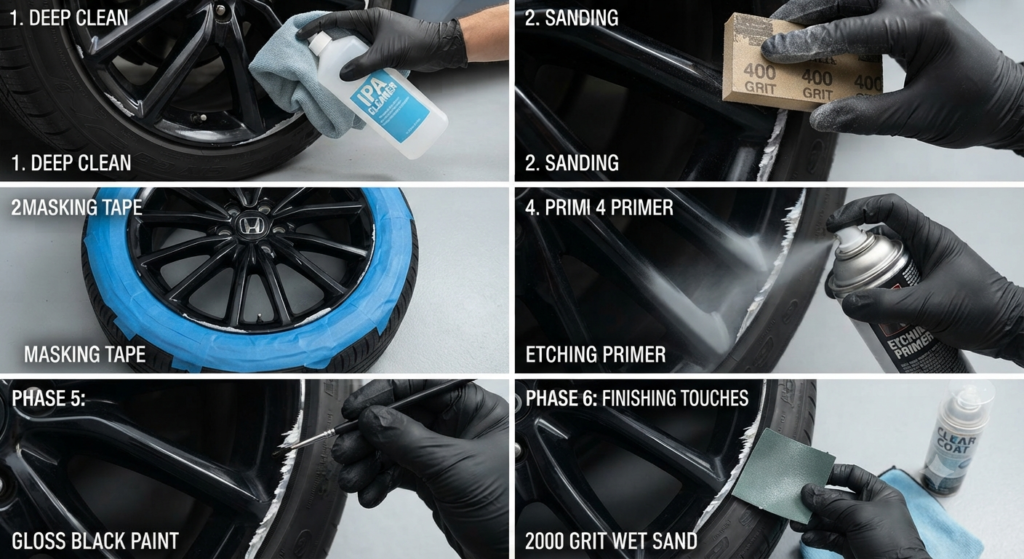
Phase 1: Deep Cleaning and Preparation
Start by washing the damaged wheel thoroughly with soap and water to remove heavy brake dust. Once dry, take a clean rag soaked in isopropyl alcohol and scrub the scratch and the surrounding area. This step is critical because any remaining wax, grease, or road grime will prevent the paint from sticking to the aluminum.
Phase 2: Sanding the Damage
Use the 400 grit sandpaper to gently sand the rough burrs created by the curb. You are not trying to sand the entire wheel. Focus only on the jagged edges of the metal. Your goal is to make the surface feel smooth to your fingertip. If the damage is deep, start with the 400 grit to level it out, then move to the 600 grit to refine the texture. Be careful not to sand the undamaged paint around the scratch unnecessarily.
Phase 3: Precise Masking
Use your masking tape to cover the tire rubber right next to the rim. You do not want any paint on your tire. If you have a very steady hand, you can skip masking the wheel itself, but using tape to define the boundaries of your repair will keep the finish clean and sharp.
Phase 4: Applying Etching Primer
Apply a very thin, controlled layer of etching primer to the bare metal. The etching primer is designed to “bite” into the aluminum, creating a permanent base for the paint. This step is the secret to preventing the paint from peeling off after your first drive. Let the primer dry for at least 30 to 45 minutes until it is completely dull.
Phase 5: The Art of Painting
This is where patience pays off. Use your micro-brush to apply the paint in tiny, thin layers. Do not try to fill the scratch in one go. If you apply a thick blob of paint, it will run, look uneven, and take much longer to cure. Apply a thin layer, wait 20 minutes, and then apply another. You may need three or four thin layers to perfectly fill the gouge until it is flush with the rest of the rim surface.
The Finishing Touches for a Seamless Look
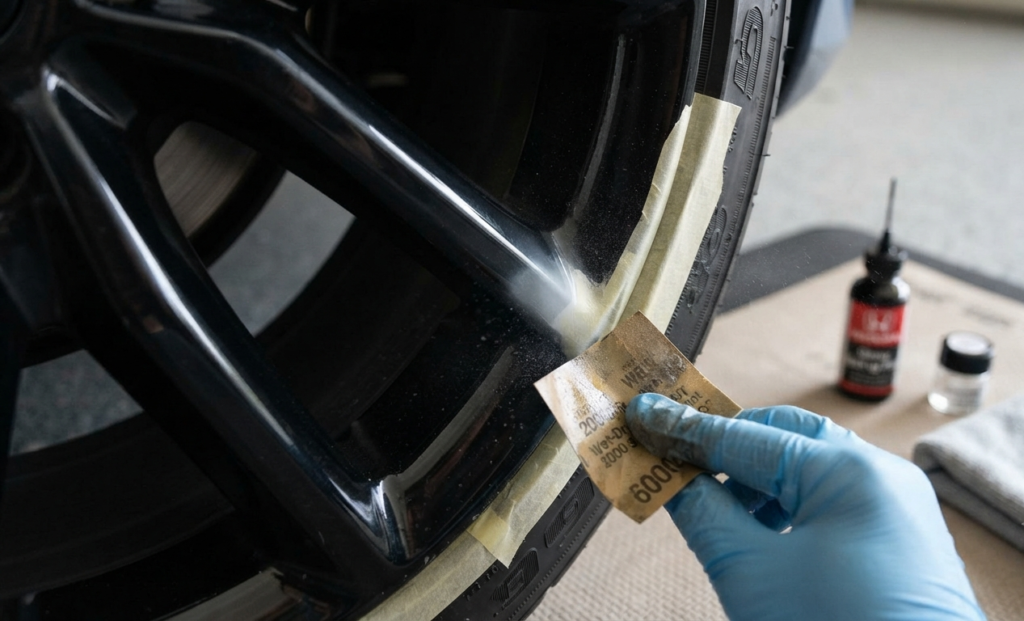
Once your paint is fully dry ideally, let it sit for at least two hours you need to blend it. If the paint feels slightly raised or uneven, take your 2000 grit sandpaper, dip it in water, and very gently wet-sand the repaired area. This will level the new paint with the surrounding factory finish.
If you have gloss black rims, the final step is a thin layer of automotive clear coat. This adds the necessary protection against UV rays and brake dust, ensuring your repair matches the factory shine. Apply the clear coat with the same light-layer technique used for the paint.