
A Complete DIY Guide for 8th, 9th, 10th, and 11th Generation Civics (1.8L, 2.4L, 1.5L Turbo, and 2.0L Engines)
Introduction: Why DIY Spark Plug Replacement Is Worth It
A dealership or shop typically charges between $150 and $250 to replace spark plugs on a Honda Civic, and most of that is labor. The parts themselves usually cost less than $40 for a full set of four.
Changing your own spark plugs is one of the most rewarding beginner-to-intermediate DIY jobs on a Civic. It takes most owners 45 minutes to 90 minutes with basic hand tools, and it directly improves fuel economy, idle smoothness, and acceleration.
This guide covers every mainstream Civic engine on the road today, from the 8th generation’s 1.8L R18 to the 11th generation’s turbocharged 1.5L and 2.0L powerplants. Follow it step by step and you will finish with a job that matches (or beats) dealership quality.
| Safety FirstAlways work on a cold engine. Spark plug wells sit directly next to the exhaust manifold and cylinder head, both of which stay dangerously hot for an hour or more after driving. Wait at least 30 to 60 minutes after the engine has been shut off before starting this job. |
Required Tools and Equipment
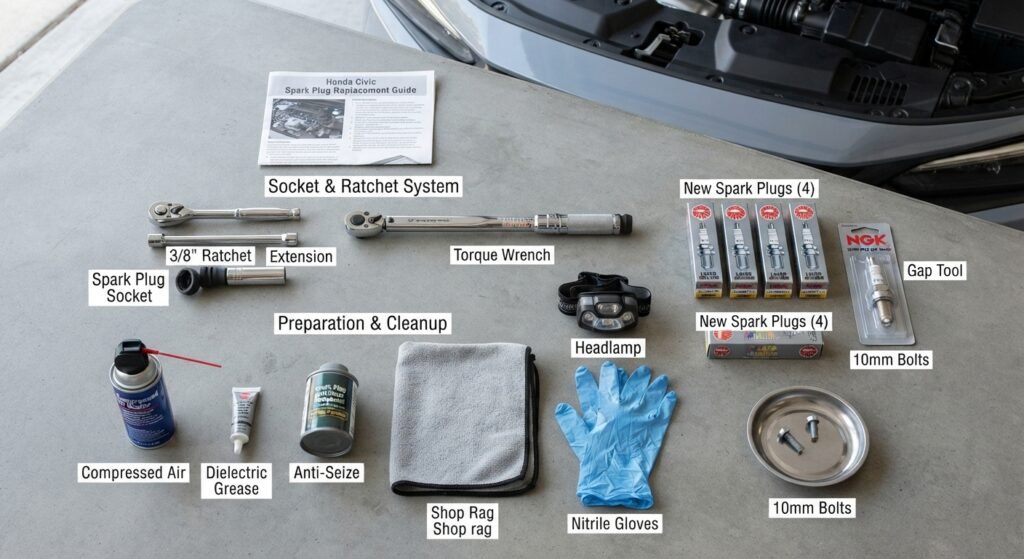
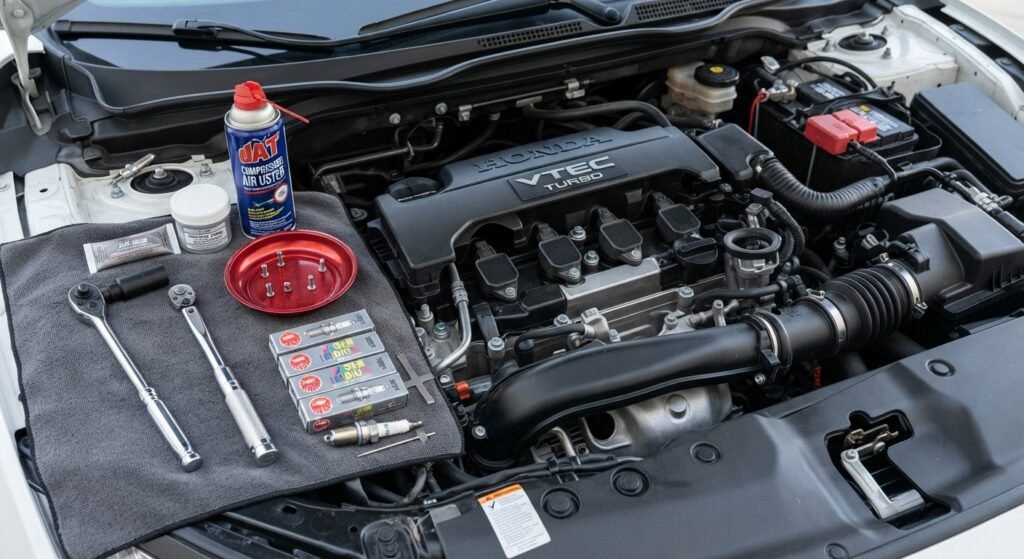
Gather everything before you start. Running to the store mid-job with an open engine bay is never fun.
| Tool / Item | Purpose | Notes |
|---|---|---|
| Spark plug socket (5/8″ or 3/4″) | Removes and installs the plug | Must have a rubber insert to grip the plug; 5/8″ fits most Civic iridium plugs |
| 3/8″ drive ratchet | Turns the spark plug socket | A long extension (6″ to 10″) is required for deep wells |
| Torque wrench (in-lb or ft-lb, 5 to 25 range) | Applies exact final torque | Non-negotiable. Do not estimate torque by feel |
| Compressed air / can of air | Clears debris from the plug well before removal | Prevents dirt from falling into the cylinder |
| Dielectric grease | Coats the ignition coil boot | A thin coat only; never on the threads |
| Spark plug gap tool (optional) | Verifies gap on non-OEM plugs | Skip if plugs are pre-gapped OEM iridium |
| Shop rags / microfiber towels | Cleanup and wiping down the coil pack area | Keep the intake area free of debris |
| Flashlight or headlamp | Illuminates deep, shadowed plug wells | Especially useful on turbo engines with tighter bays |
| Anti-static gloves (optional) | Protects hands, keeps grease off connectors | Not required but helpful |
Recommended Replacement Intervals by Engine Type
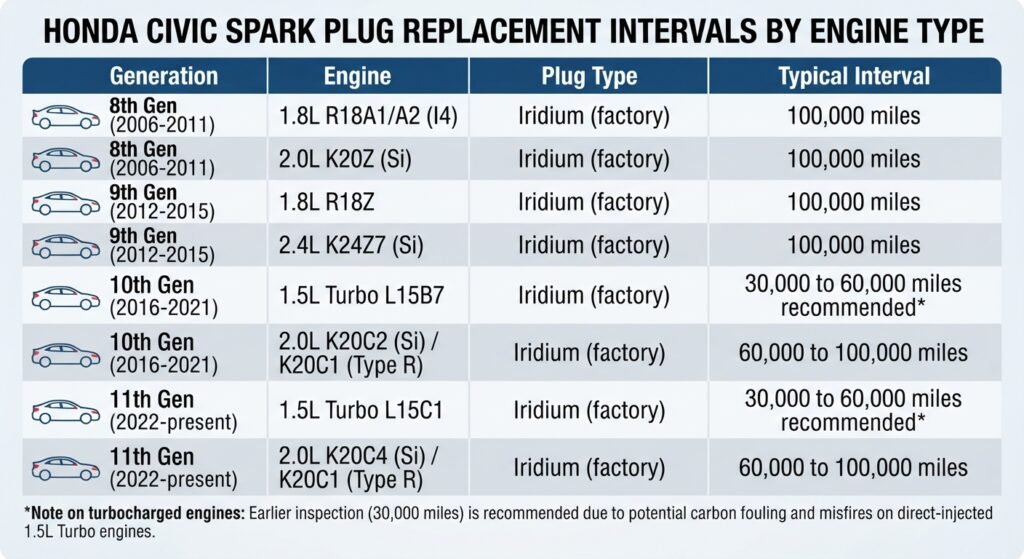
Honda specifies different intervals depending on the engine family and plug design. Use this table as a quick reference, and always cross-check the interval printed on your Maintenance Minder or in your specific model year’s owner’s manual.
| Generation | Engine | Plug Type | Typical Interval |
|---|---|---|---|
| 8th Gen (2006-2011) | 1.8L R18A1/A2 (I4) | Iridium (factory) | 100,000 miles |
| 8th Gen (2006-2011) | 2.0L K20Z (Si) | Iridium (factory) | 100,000 miles |
| 9th Gen (2012-2015) | 1.8L R18Z | Iridium (factory) | 100,000 miles |
| 9th Gen (2012-2015) | 2.4L K24Z7 (Si) | Iridium (factory) | 100,000 miles |
| 10th Gen (2016-2021) | 1.5L Turbo L15B7 | Iridium (factory) | 30,000 to 60,000 miles recommended* |
| 10th Gen (2016-2021) | 2.0L K20C2 (Si) / K20C1 (Type R) | Iridium (factory) | 60,000 to 100,000 miles |
| 11th Gen (2022-present) | 1.5L Turbo L15C1 | Iridium (factory) | 30,000 to 60,000 miles recommended* |
| 11th Gen (2022-present) | 2.0L K20C4 (Si) / K20C1 (Type R) | Iridium (factory) | 60,000 to 100,000 miles |
*Note on turbocharged engines: Honda’s official Maintenance Minder may display a longer interval, but many independent techs and owners see earlier carbon fouling and misfires on the direct-injected 1.5L Turbo. Inspecting plugs at the 30,000-mile mark is cheap insurance.
Step-by-Step DIY Guide
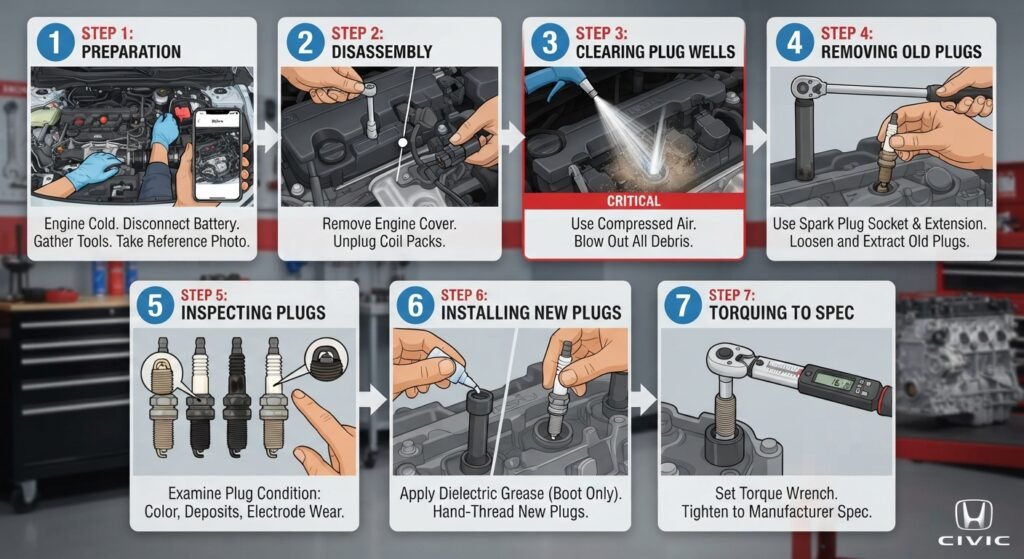
This procedure is written to be modular. Each phase stands on its own, which means it can be adapted for future powertrain variants (including hybrid or electric-assisted Civic models) without changing the core mechanical steps below.
Step 1: Preparation
- Park on a flat surface and let the engine cool for at least 30 to 60 minutes.
- Disconnect the negative battery terminal to prevent electrical shorts or accidental starter engagement.
- Lay out your tools in the order you will use them: socket, extension, ratchet, torque wrench, dielectric grease.
- Identify your engine cover. Most Civics use two or three 10mm bolts or quick-release clips to secure it.
Take a photo of the engine bay before you start. It is a simple trick that makes reassembly foolproof, especially around vacuum lines and connectors.
Step 2: Disassembly
- Remove the plastic engine cover, setting bolts aside in a small tray or magnetic dish.
- Locate the ignition coil packs sitting directly above each spark plug well. On 1.5L Turbo and 2.0L engines, these sit lower and closer together than on the older 1.8L engines.
- Unclip the electrical connector on top of each coil by pressing the small tab and pulling straight up.
- Remove the coil retaining bolt (usually a 10mm or 8mm bolt) and pull the coil pack straight up and out of the well.
Coils can feel stuck due to the rubber boot gripping the plug. Wiggle gently side to side while pulling upward. Never pry with a screwdriver, since this can crack the coil housing.
Step 3: Clearing the Plug Wells (Critical Step)
| Do Not Skip This StepDebris, oil residue, and dirt collect around the top of every spark plug well. If you remove the plug before clearing this debris, it can fall directly into the combustion chamber and cause severe internal engine damage. |
- Use compressed air (a shop compressor or a can of electronics duster) to blow out each well thoroughly before touching the plug.
- Aim the air nozzle into the well and give it several short bursts, rotating the angle slightly to dislodge debris from all sides.
- Wipe the top of the well with a clean rag or use a small brush for stubborn buildup, especially on higher-mileage 1.8L and 2.4L engines.
- Repeat for all four wells before moving to plug removal.
Step 4: Removing the Old Plugs
- Fit the spark plug socket over the first plug and attach your extension and ratchet.
- Turn counterclockwise to loosen. The first quarter turn is often the tightest; go slow to avoid slipping off the hex.
- Lift the plug straight up and out once it is fully unthreaded, keeping the socket’s rubber insert gripping the plug so it does not fall back into the well.
- Set each old plug aside in order (cylinder 1 through 4) if you want to visually diagnose cylinder-specific issues.
Step 5: Inspecting the Old Plugs
The condition of your old plugs tells a story about how your engine is running. Compare what you see to these common patterns:
- Light tan or gray deposits: Normal wear, engine running correctly.
- Black, sooty deposits: Rich fuel mixture, possible fouled injector, or an air intake issue.
- Oily, wet deposits: Oil is leaking past worn valve seals or piston rings into that cylinder.
- White, blistered, or eroded electrode: Engine running too hot, or a lean fuel condition.
- Worn, rounded electrode: Normal end-of-life wear from high mileage.
If one cylinder’s plug looks dramatically different from the other three, that cylinder deserves closer diagnostic attention beyond simple plug replacement.
Step 6: Preparing and Installing New Plugs
- Never use anti-seize compound on modern plated spark plug threads. Factory Honda plugs, along with genuine NGK and Denso iridium replacements, use a trivalent or zinc-plated thread coating designed to prevent seizing on its own.
- Anti-seize actually causes problems here: it changes the effective torque at the threads, which commonly leads to over-tightening, thread galling, or a plug that self-loosens over time.
- Only apply anti-seize if the manufacturer’s instructions explicitly call for it, which is rare on any Civic built in the last 15+ years.
- Do not adjust the gap on factory-spec OEM iridium plugs. They arrive pre-gapped and are not designed to be bent or re-gapped.
- If installing an aftermarket iridium or platinum plug, verify the gap against the specification printed on the box before installation.
- Thread each new plug in by hand first, turning clockwise. It should spin freely for several rotations with light finger pressure.
- If you feel resistance early, stop immediately and back it out. Cross-threading an aluminum Civic cylinder head is an expensive mistake and one of the most common ones on this job.
- Once hand-tight, snug the plug down with the ratchet until it seats against the cylinder head sealing washer.
Step 7: Torquing to Spec
This is the single most important step in the entire job. Under-torquing risks a plug backing out or a poor combustion seal. Over-torquing on an aluminum head can strip the threads permanently, turning a simple job into a costly repair.
| Engine Family | Thread Size | Torque Spec |
|---|---|---|
| 1.8L R18 (8th/9th Gen) | M12 x 1.25 | 13 lb-ft (156 in-lb) |
| 2.4L K24 (9th Gen Si) | M12 x 1.25 | 13 lb-ft (156 in-lb) |
| 1.5L Turbo L15B7 / L15C1 (10th/11th Gen) | M12 x 1.25 | 15 to 16 lb-ft (180 to 192 in-lb) |
| 2.0L K20C2 / K20C4 / K20C1 (Si / Type R) | M12 x 1.25 | 15 to 16 lb-ft (180 to 192 in-lb) |
Always verify the exact spec against your model year’s factory service manual, since running production changes can shift torque values slightly between trims.
- Set your torque wrench to the correct value from the table above.
- Tighten each plug in a smooth, steady motion until the wrench clicks or signals that torque has been reached. Stop immediately.
- Apply a thin layer of dielectric grease to the inside of each coil boot before reinstalling it. This prevents the boot from sticking to the plug ceramic over time and eases future removal.
- Reinstall each coil pack, reconnect its electrical connector, and replace the retaining bolt.
- Reinstall the plastic engine cover and reconnect the negative battery terminal.
Critical Mistakes That Destroy Honda Engine Heads

Civic cylinder heads are aluminum, which is softer and less forgiving than the cast iron used in older vehicles. These mistakes account for the vast majority of expensive spark plug jobs gone wrong.
1. Using Anti-Seize on Plated Threads
As covered above, this is the number one mistake DIYers copy from outdated advice online. Modern plated plugs do not need it, and adding it changes your torque readings unpredictably.
2. Cross-Threading During Installation
Always start every plug by hand. If a ratchet is required to get the first few threads started, stop and realign the plug before continuing.
3. Over-Torquing Because “Tighter Feels Safer”
A torque wrench exists precisely because human hands cannot reliably judge 13 to 16 lb-ft. Skipping the torque wrench is the leading cause of stripped aluminum threads on Civic heads.
4. Letting Debris Fall Into the Cylinder
Skipping the compressed air step in Step 3 lets sand, dust, and carbon flakes drop directly onto the piston crown, where they can cause scoring or, in rare cases, complete engine failure on startup.
5. Forcing a Stuck Coil Pack With a Screwdriver
Prying a stuck coil pack cracks the plastic housing and can damage the ignition boot. Wiggle and pull straight up instead, applying steady, even pressure.
6. Mixing Plug Brands or Heat Ranges
Always install a matched set of four identical plugs. Mixing heat ranges or brands mid-set can cause uneven combustion and inconsistent misfire codes that are difficult to diagnose later.
Warning: Counterfeit NGK Spark Plugs on Online Marketplaces

| Buyer BewareCounterfeit NGK spark plugs are a well-documented problem on major third-party marketplace listings, particularly from unverified third-party sellers offering suspiciously low prices. |
NGK has publicly acknowledged counterfeit products entering the US market through unauthorized online sellers. These fakes often use lower-grade metals that wear out in a fraction of the expected lifespan and can cause misfires shortly after installation.
Protect yourself with these buying habits:
- Buy directly from NGK’s official website, a Honda dealership parts counter, or a marketplace listing where the seller is clearly listed as “NGK” or an authorized automotive parts retailer.
- Be suspicious of prices that sit dramatically below the average retail cost for that part number.
- Check the packaging closely. Genuine NGK boxes have consistent print quality, a matte finish, and a scannable QR or barcode that matches the part number stamped on the plug itself.
- Avoid third-party marketplace listings with mismatched product photos, inconsistent seller ratings, or reviews mentioning early failure.
- Cross-reference the part number on the plug itself (for example, ILZKAR7C11 for many 1.5L Turbo Civics) against NGK’s official fitment guide before installing.
Post-Installation Troubleshooting: Misfires and Check Engine Light
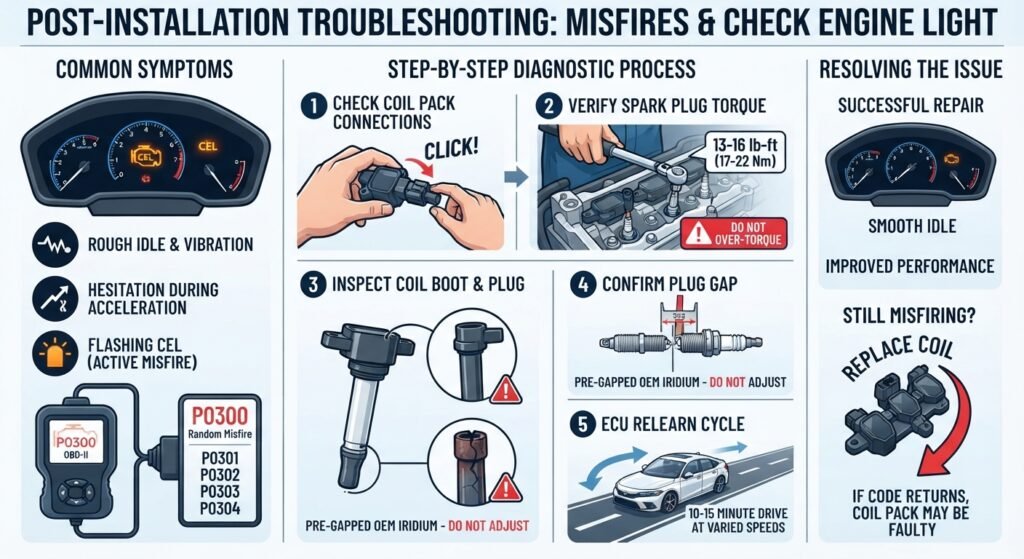
A properly installed set of plugs should run smoothly from the first start. If something feels off, work through these checks before assuming a bigger problem exists.
Check Engine Light or Rough Idle Right After Installation
- P0300 (Random/Multiple Cylinder Misfire): Usually points to a coil connector that was not fully clipped back into place, or a plug that was not torqued to spec and is not sealing properly.
- P0301, P0302, P0303, P0304 (Cylinder-Specific Misfire): Points directly to the cylinder in question. Recheck that specific coil’s connector, boot seating, and plug torque first.
- Rough idle only, no stored code yet: Often resolves itself after an ECU relearn cycle, which can take 5 to 10 minutes of idle and light driving.
Step-by-Step Fix Process
- Recheck each coil pack connector. It should click firmly into place; a loose click is the single most common cause of a post-installation misfire.
- Pull the coil on the flagged cylinder and confirm the plug is threaded in fully and was torqued, not just hand-tight.
- Inspect the coil boot for cracks or debris that could prevent a full seal against the plug ceramic.
- Clear the code with an OBD-II scanner, then take a 10 to 15 minute drive covering a range of engine speeds to let the ECU relearn.
- If the code returns immediately, the coil pack itself may be original equipment nearing failure and worth replacing along with the plugs.
Most post-installation misfires trace back to a connector that was not fully seated rather than the plug itself. Always start troubleshooting there before assuming a defective part.
Frequently Asked Questions
How much does it cost to change spark plugs on a Honda Civic myself?
A full set of four OEM-equivalent iridium plugs typically costs $25 to $45. Compared to a $150 to $250 dealership labor charge, DIY replacement saves most owners well over $100.
Do I really need a torque wrench for this job?
Yes. Aluminum cylinder heads are unforgiving of guesswork, and a torque wrench is the only reliable way to hit the 13 lb-ft or 15 to 16 lb-ft specs without risking stripped threads.
Can I reuse the old ignition coil boots or should I replace them?
Boots can typically be reused if they show no cracking and the coil tests fine electrically. A thin coat of dielectric grease extends their life and eases future removal.
Why does my 1.5L Turbo Civic seem to need plugs more often than older models?
Direct-injected turbo engines run hotter and build carbon deposits faster than the older naturally aspirated 1.8L and 2.4L engines, which is why many owners see earlier fouling and choose to inspect plugs around 30,000 miles.
Is it normal for one cylinder’s plug to look different from the others?
No. A plug that looks noticeably different (oilier, sootier, or more worn) usually points to a cylinder-specific issue such as a valve seal leak or a weak coil, and it is worth investigating further.
What size socket do I need for Civic spark plugs?
Most Civic engines use a 5/8 inch spark plug socket. Always confirm fitment for your specific engine before starting, since a socket that is even slightly off can round the plug’s hex.
Always confirm torque specs, gap sizes, and replacement intervals against the factory service manual for your specific model year and trim, since running changes can occur mid-production.