
2016–2026 Complete US Guide • All Trims: Sport, EX, Touring • Updated March 2026
| ⚡ QUICK ANSWER — 10-Second FixAlready inflated your tires? Here’s the reset:Step 1: Inflate all four tires to the PSI listed on your driver-side door jamb.Step 2: Start the car. Navigate to Home > Settings > Vehicle > TPMS Calibration and tap Calibrate (2022–2026).Step 3: Drive at 30–65 mph for approximately 30 minutes. The light turns off automatically.Stubborn light? See the Triple-Reset Trick in Section 3. |
Introduction: Why Your Honda Civic TPMS Light Comes On
You walk out to your Honda Civic on a cold January morning, and there it is — that unmistakable orange horseshoe with an exclamation point glowing on your dashboard. If you’re a US Civic owner, this scene plays out millions of times every fall and winter, and the reason is pure physics.
The Honda Civic uses an Indirect TPMS system. It does not have physical pressure sensors screwed into each valve stem. Instead, it relies on your car’s existing ABS wheel speed sensors to monitor how fast each wheel rotates. When a tire loses pressure, its diameter shrinks slightly — it rolls differently — and the ABS sensors detect that deviation and trigger the warning light.
| 🌡️ Why US Winters Trigger This LightTire pressure drops roughly 1 PSI for every 10°F drop in outside temperature. In most US regions, the temperature swing between a warm September afternoon and a cold December morning can easily be 40–60°F — a 4–6 PSI drop that triggers the indirect TPMS system without any actual puncture or leak. You are not imagining it, and your tires are probably fine. They just need air and a reset. |
Section 1: Critical Steps Before You Hit the Reset Button

Skipping straight to the reset menu is one of the most common mistakes Civic owners make. If you calibrate the TPMS at the wrong tire pressure, the light will return within days. Take five minutes to do this correctly.
Step 1: Find Your Correct Cold Tire Pressure
The first and most important thing you need is your vehicle’s recommended cold tire pressure. Open your driver’s door and look at the driver-side door jamb — the metal pillar where the door latches when closed. You will see a sticker listing the front and rear recommended PSI values for your specific Civic trim and wheel size. This is the number you want. Do not use the maximum PSI printed on the tire sidewall — that is the tire’s physical limit, not Honda’s recommendation.
| ⚠️ Common PSI Values for US-Market CivicsMost 10th and 11th Gen Civics specify approximately 35 PSI front and rear, though Sport trims with 18-inch wheels and Touring models may vary. Always verify your door jamb sticker — your specific car’s spec is the only number that matters. |
Step 2: Check Pressure When Tires Are Cold
Tire pressure readings are only accurate when the tires are cold — meaning the car has been parked for at least three hours or driven fewer than one mile at low speed. Heat from driving expands the air inside the tire, inflating the reading by 4–6 PSI. A quality digital tire pressure gauge costs under $15 and is far more accurate than gas station gauges.
Pre-Reset Checklist
Before proceeding to the reset procedure, confirm all of the following:
All four tires are inflated to the cold tire pressure listed on the driver-side door jamb sticker.
You measured tire pressure while tires were cold (parked 3+ hours, or driven less than 1 mile).
You visually inspected all four tires for punctures, sidewall damage, or objects in the tread.
If the TPMS light is flashing (not solid), review the comparison table in Section 3 before proceeding.
Your car is fully started — not just in accessory mode. TPMS calibration requires the engine running.
| ✅ Why Indirect TPMS Is Actually a FeatureBecause the Civic’s indirect TPMS piggybacks on the ABS wheel speed sensors already present in every ABS-equipped vehicle, there is no battery to replace and no valve stem sensors to lose at a tire shop. The tradeoff is that it requires a manual recalibration any time you adjust tire pressure — including seasonal inflations and rotations. |
Section 2: Step-by-Step Reset Guide by Generation
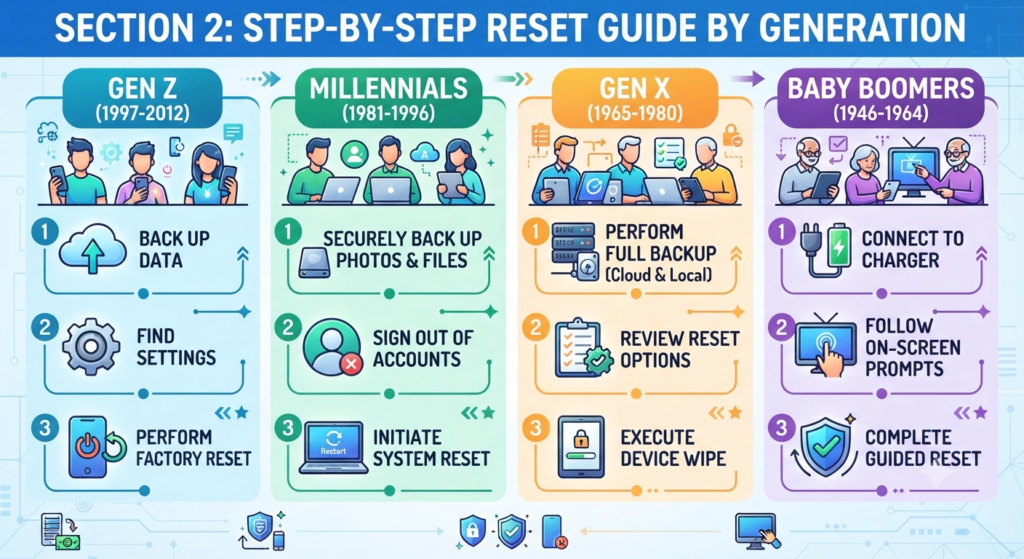
Find your generation below. 2022 and newer = 11th Gen. 2016–2021 = 10th Gen. Older models = Legacy section.
11th Generation Honda Civic (2022–2026)
| 📱 Screen: 9-Inch Touchscreen — All US TrimsAll 11th Gen US trims (Sport, Sport Touring, EX, EX-L, Touring) use a standard 9-inch touchscreen, making this the most consistent generation to reset. |
Step 1: Inflate All Tires
Inflate all four tires to the PSI on your driver-side door jamb. Most 11th Gen Civics spec 35 PSI front and rear — verify your specific sticker.
Step 2: Start the Engine
Start your Civic and wait for the infotainment screen to fully load. Do not proceed in accessory mode.
Step 3: Navigate to TPMS Calibration
On the 9-inch touchscreen, follow this exact path:Home > Settings > Vehicle > TPMS CalibrationOn Sport and EX trims this may appear as “Tire Pressure”; Touring trims consistently use “TPMS Calibration”.
Step 4: Tap Calibrate
A confirmation screen will appear. Tap Calibrate (or Initialize on some software versions). The system confirms with “Calibration has started.”
Step 5: Complete the Calibration Drive
Drive at 30–65 mph for approximately 30 minutes without stopping. The TPMS light turns off when calibration is complete. See Section 3 for the full protocol.
10th Generation Honda Civic (2016–2021)
| 🖥️ Know Your Screen Size First7-inch screen: Found on LX and Sport trims (base/mid configurations).8-inch screen: Found on EX, EX-T, EX-L, and Touring trims. The navigation paths differ slightly. |
If You Have the 7-Inch Screen (LX / Sport Trims)
Step 1: Inflate Tires & Start Engine
Inflate all four tires to cold tire pressure from your driver-side door jamb sticker. Start the engine fully.
Step 2: Navigate on 7-Inch Screen
Follow this path:Home > Settings > Vehicle > Tire Pressure Monitor
Step 3: Select Calibrate and Drive
Tap Calibrate and confirm when prompted. Then complete a 30-minute calibration drive at 30–65 mph.
If You Have the 8-Inch Screen (EX / EX-L / Touring Trims)
Step 1: Inflate Tires & Start Engine
Confirm all four tires are at correct cold pressure per your driver-side door jamb. Start engine fully.
Step 2: Navigate on 8-Inch Screen
Follow this path:Home > Settings > Vehicle Settings > TPMS Calibration
Step 3: Tap Initialize and Drive
EX and Touring trims on 10th Gen use the word Initialize rather than Calibrate. Tap it, confirm, and drive 30–65 mph for 30 minutes.
| 💡 No Touchscreen? Use Steering Wheel ControlsOn base 2016–2018 LX trims without a touchscreen: press the Info button until you reach the Maintenance screen, then use the arrow buttons to find TPMS Calibration and press SEL/RESET to confirm. |
Legacy Honda Civic (2012–2015, 9th Generation)
9th Gen Civics use a simpler reset procedure entirely through the instrument cluster using steering wheel buttons — there is no touchscreen calibration menu.
Step 1: Inflate All Four Tires
Inflate to the cold tire pressure on your driver-side door jamb sticker. Start the engine and let the instrument cluster fully initialize.
Step 2: Navigate the Instrument Cluster
Using the INFO button on the left side of your steering wheel, scroll through the trip computer displays until you see the Tire Pressure or TPMS screen in the multi-information display.
Step 3: Hold the SEL/RESET Button
With the TPMS screen displayed, press and hold the SEL/RESET button on the right side of the steering wheel for approximately 3 seconds until you see a confirmation message or the TPMS indicator blinks twice.
Step 4: Complete the Drive Cycle
Drive at 30–65 mph for 30 minutes. The light will extinguish when calibration is complete.
Section 3: Troubleshooting & Calibration Drive Protocol
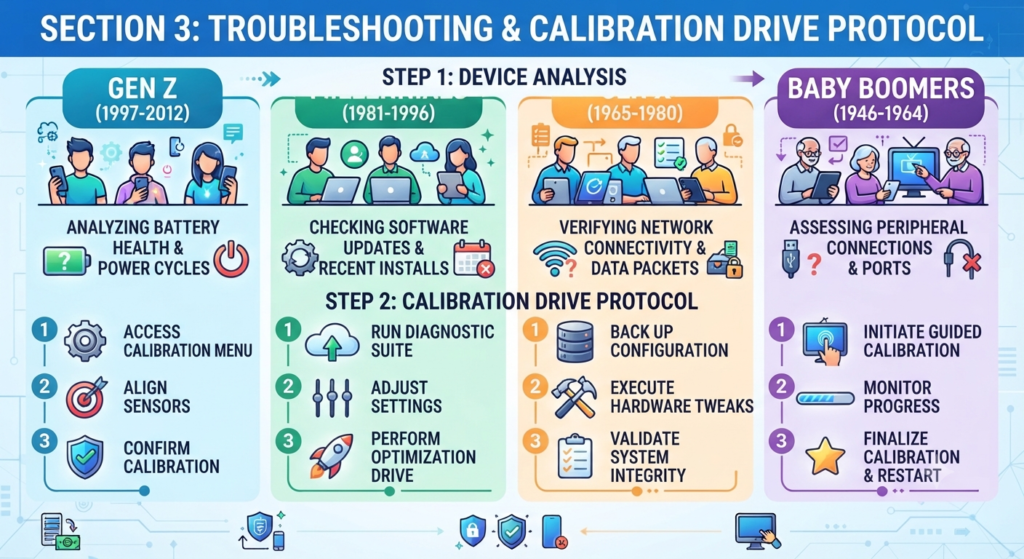
Hitting Calibrate in the menu is only half the job. The TPMS system needs to observe your tire rotation patterns over real driving conditions. Here is exactly how to finish the process correctly — and what to do when the light refuses to go out.
First: What Is Your Light Doing?
Before you drive anything, take 10 seconds to identify which situation you’re in.
| Light | What It Means | What to Do | Urgency |
|---|---|---|---|
| SOLID ON | Low Tire Pressure — most common in US winters. | Inflate all four tires to door jamb PSI, then follow Section 2 reset. | Low — safe to drive to gas station. |
| FLASHING then SOLID | System Malfunction — often after battery disconnect, tire rotation, or ABS sensor fault. | Inflate tires, perform Triple-Reset Trick. If persists after 3 attempts, scan with OBD-II. | Moderate — diagnose within a week. |
| Returns after days | Slow leak or leaking valve stem — a real pressure loss. | Have tires inspected at a tire shop. Do not just keep resetting. | High — inspect promptly. |
| Never goes off after drive | ABS wheel speed sensor fault providing bad data to TPMS module. | Scan for C-codes (C0035–C0041) with OBD-II reader. | Moderate — schedule dealer visit. |
The 30-Minute / 30–65 MPH Calibration Drive
| 🚗 The Calibration Drive RuleAfter initiating calibration, drive continuously at 30–65 mph for a minimum of 30 minutes without stopping. The system monitors ABS wheel speed sensor data to establish a new rotation baseline for all four tires. Stop-and-go city driving will NOT complete calibration — you need sustained highway or arterial speeds. The TPMS light turns off on its own when calibration succeeds, typically within 20–30 minutes at proper speed. |
Why speed matters: Because the system measures wheel rotation rate differences (not pressure directly), it needs enough data points to establish an accurate statistical baseline. At 30–65 mph on a relatively straight road, the ABS sensors generate clean, consistent rotation data that the TPMS module uses to confirm all four tires are behaving normally.
The Triple-Reset Trick (For Stubborn Lights)

| 🔧 Pro Trick — For Lights That Refuse to Go OutIf your TPMS light won’t turn off after a full calibration drive, this three-step procedure forces a deeper system flush by completely clearing the TPMS memory and restarting calibration from scratch. Step 1: Re-check and re-inflate all tires to 3–4 PSI above your door jamb spec (e.g., 38–39 PSI if spec is 35 PSI). This ensures the sensors have unambiguous input data.Step 2: Navigate to TPMS Calibration (see Section 2 for your generation). Tap Calibrate, wait for the confirmation, then immediately return and tap Calibrate a second time, then a third time. You will have initiated calibration three consecutive times before driving.Step 3: Release pressure from all four tires back to the correct door jamb PSI. Now complete the full 30-minute / 30–65 mph calibration drive. The triple-reset clears the previous baseline; the pressure change gives the system a detectable reference point to lock onto. |
| 🔋 Just Replaced Your Battery? Do This FirstDisconnecting the 12V battery clears the TPMS calibration memory entirely. Before resetting, let the car sit with the engine running for 10 minutes so all modules fully reinitialize. Then inflate tires, perform the reset, and complete the calibration drive. Skipping this wait is a common reason the reset fails after battery replacement. |
After Tire Rotations
Any time a tire shop rotates your tires, the TPMS calibration is invalidated. Always ask your shop to reset the TPMS after a rotation, or do it yourself immediately afterward. The same applies after installing winter tires or swapping wheel sets.
| 🚨 When to See a DealerIf the TPMS light flashes at startup and remains on after two full Triple-Reset attempts — and all four tires are properly inflated — you likely have a faulty ABS wheel speed sensor. An OBD-II scan will show a C-code in the C0035–C0041 range. This is a hardware issue that cannot be resolved with a calibration reset and requires a shop visit. Most ABS sensor replacements run $150–$300 at an independent shop. |
Final Recap: TPMS Reset Checklist
Correct cold PSI from driver-side door jamb sticker.
All four tires inflated before starting the car.
Navigate to TPMS Calibration in settings and tap Calibrate / Initialize.
Drive 30–65 mph for 30 minutes continuously.
Light off? Done. Light still on? Use the Triple-Reset Trick.
© 2026 RevCivic.com — Independent Honda Civic Resource for US Owners